DBI Pi: A Raspberry Pi Desktop Built to Last
There's a particular frustration that builds up slowly if you pay attention to the all-in-one computers you own. They work well. Then they age. Then one component becomes a bottleneck, or the software outgrows the hardware, and you start looking at replacements. The replacement is never just the part that failed or is looking tired. It's the whole thing, including all the bits that are doing just fine (often including an excellent keyboard).
We set out to make a computer that solved the future-proofing problem. Or at least to make a serious attempt at solving it. We think we cracked it.
Watch the full build, or read on for the details.
Why make something?
Mostly because this was an itch that wasn't scratched by any of the computers we knew about. That and we don't need much of an excuse to start tinkering.
The brief we set ourselves was simple: build a compact desktop computer that looks different, is usable, and lasts a long time. Not just in terms of build quality, but structurally. Something where the case and the concept survive multiple generations of hardware, so that upgrading means swapping a module rather than binning the machine.
Most compact computers are sealed units. That's not necessarily a criticism. One cable, everything included, plug in and go. There's real value in that. But when the hardware inside becomes outdated, the whole thing goes. Including any keyboard or peripheral built into it. You don't get to keep anything. The upgrade path doesn't exist.
We thought there was a better way. So we set three rules before starting:
- The keyboard is not part of the computer.
- The case outlasts the hardware inside it.
- Whatever we build, we share the recipe: files, settings, parts list, everything.
A brain that upgrades

The Compute Module
The hardware requirements pointed us straight to the Raspberry Pi Compute Module.
Think of it like a stick of RAM, except it _is_ the entire computer. Processor, memory, storage interface, all packaged onto something roughly the size of a credit card, designed to slot cleanly in and out of a carrier board. The I/O board provides the ports, power, and connectivity the module needs to talk to the outside world. The module is the brain. The I/O board is everything that brain needs to function.
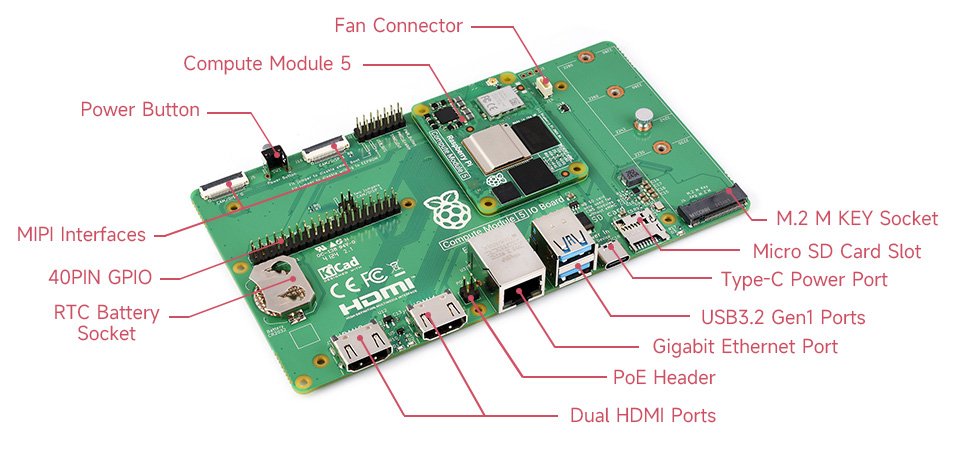
The I/O board
The Compute Module was originally designed for industrial equipment: machines built to run for years, not cycles. That same philosophy applies here. When the next generation of Raspberry Pi hardware arrives, the case stays. The keyboard stays. You swap the module, close the lid, and you're done.
The case
Inspo from the elderly
Function was the easy part. Visual character was harder.
We didn't want a computer that disappears politely under the monitor. The obvious move is minimal, aluminium, tasteful. Objects that look like nothing in particular, which is exactly how they're designed to feel. There are enough of those.
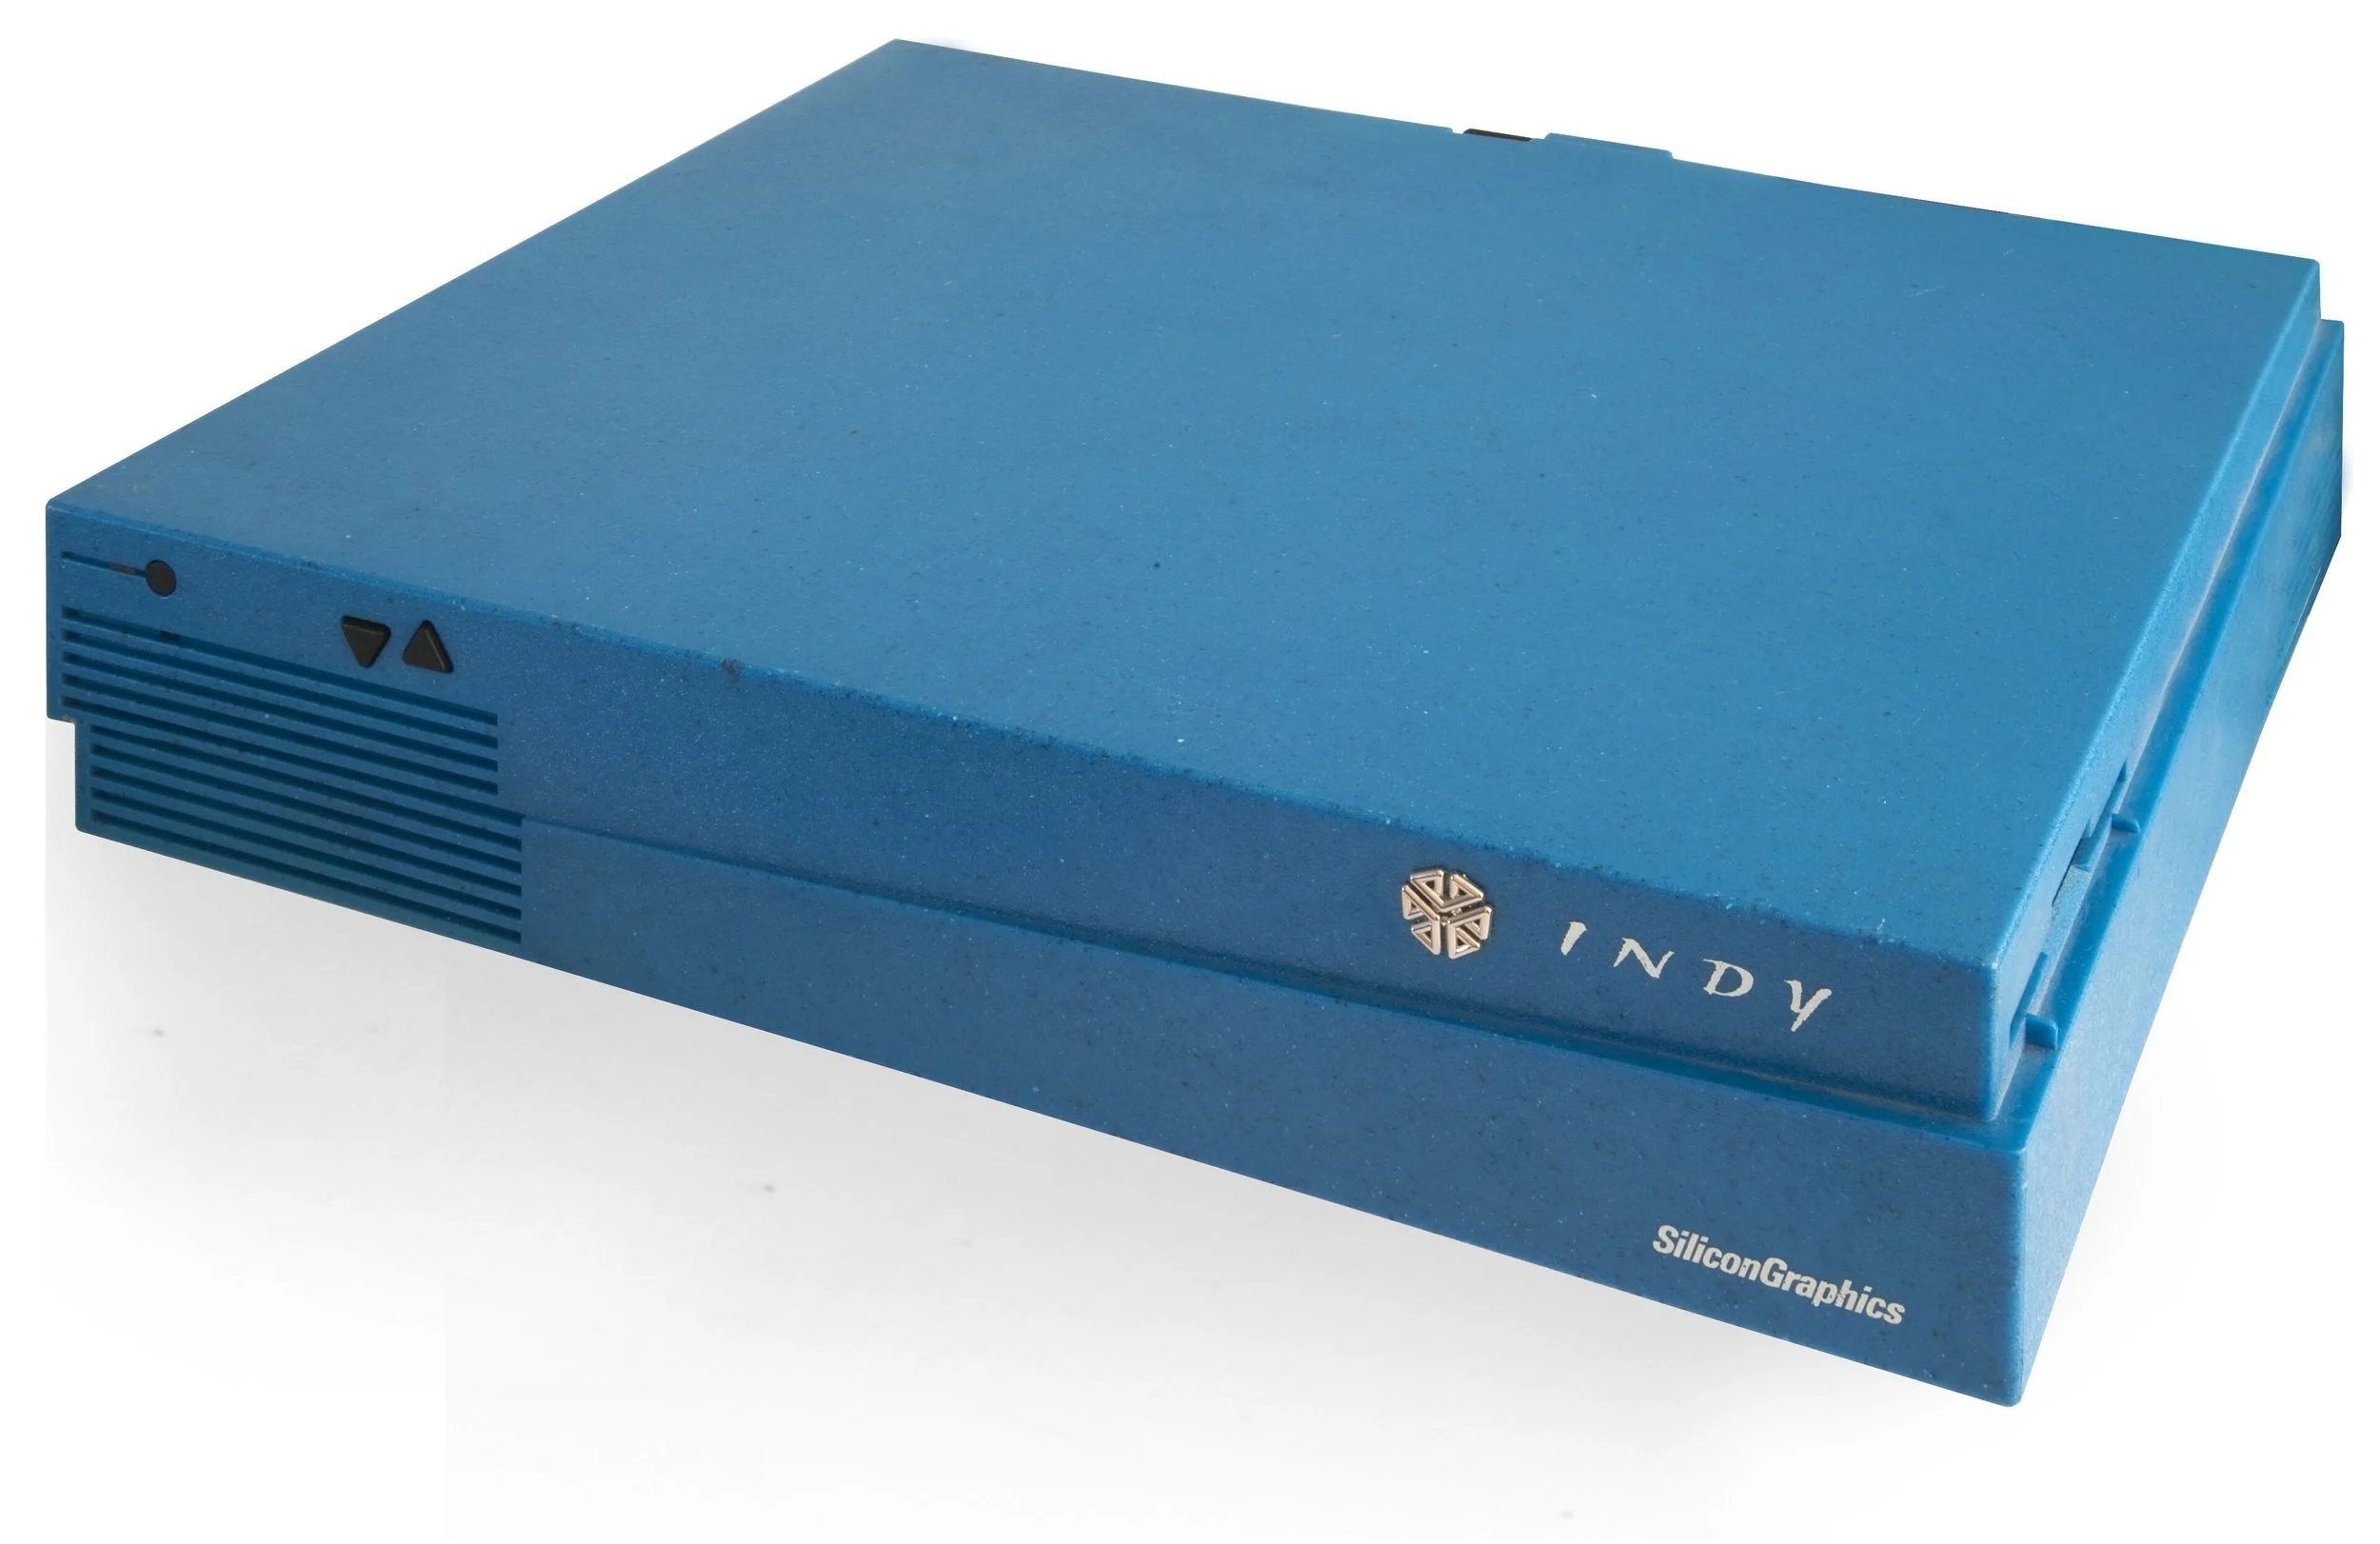
So we went back over thirty years and found the Silicon Graphics Indy.
Introduced in 1993, the Indy was a professional workstation used in VFX studios and research labs. If you worked with serious graphics in the 90s, you knew it. Every other PC at the time was a beige rectangle. The Indy was angular, wedge-shaped, and teal, almost periwinkle. It looked fast when it was switched off. It had a presence that the computing industry has spent the last two decades designing out of existence.
The brief for the DBI Pi was shameless homage, not replica. Something that announces itself. Something you want to look at every day. Where the original said Silicon Graphics, ours bears the name of our mythical hardware company: Dirtboy.Industries. Founded in nobody's garage. Building machines that nobody asked for.
Oh and seeing as we are borrowing from the Indy, we definitely need the same startup sound. I'm pretty sure that it was the only computer ever made that sounded like it was doing Jazz Hands every time you turned it on.
Ba Ba-Da Ba… Pow! (high kick optional)
Designing the case in FreeCAD
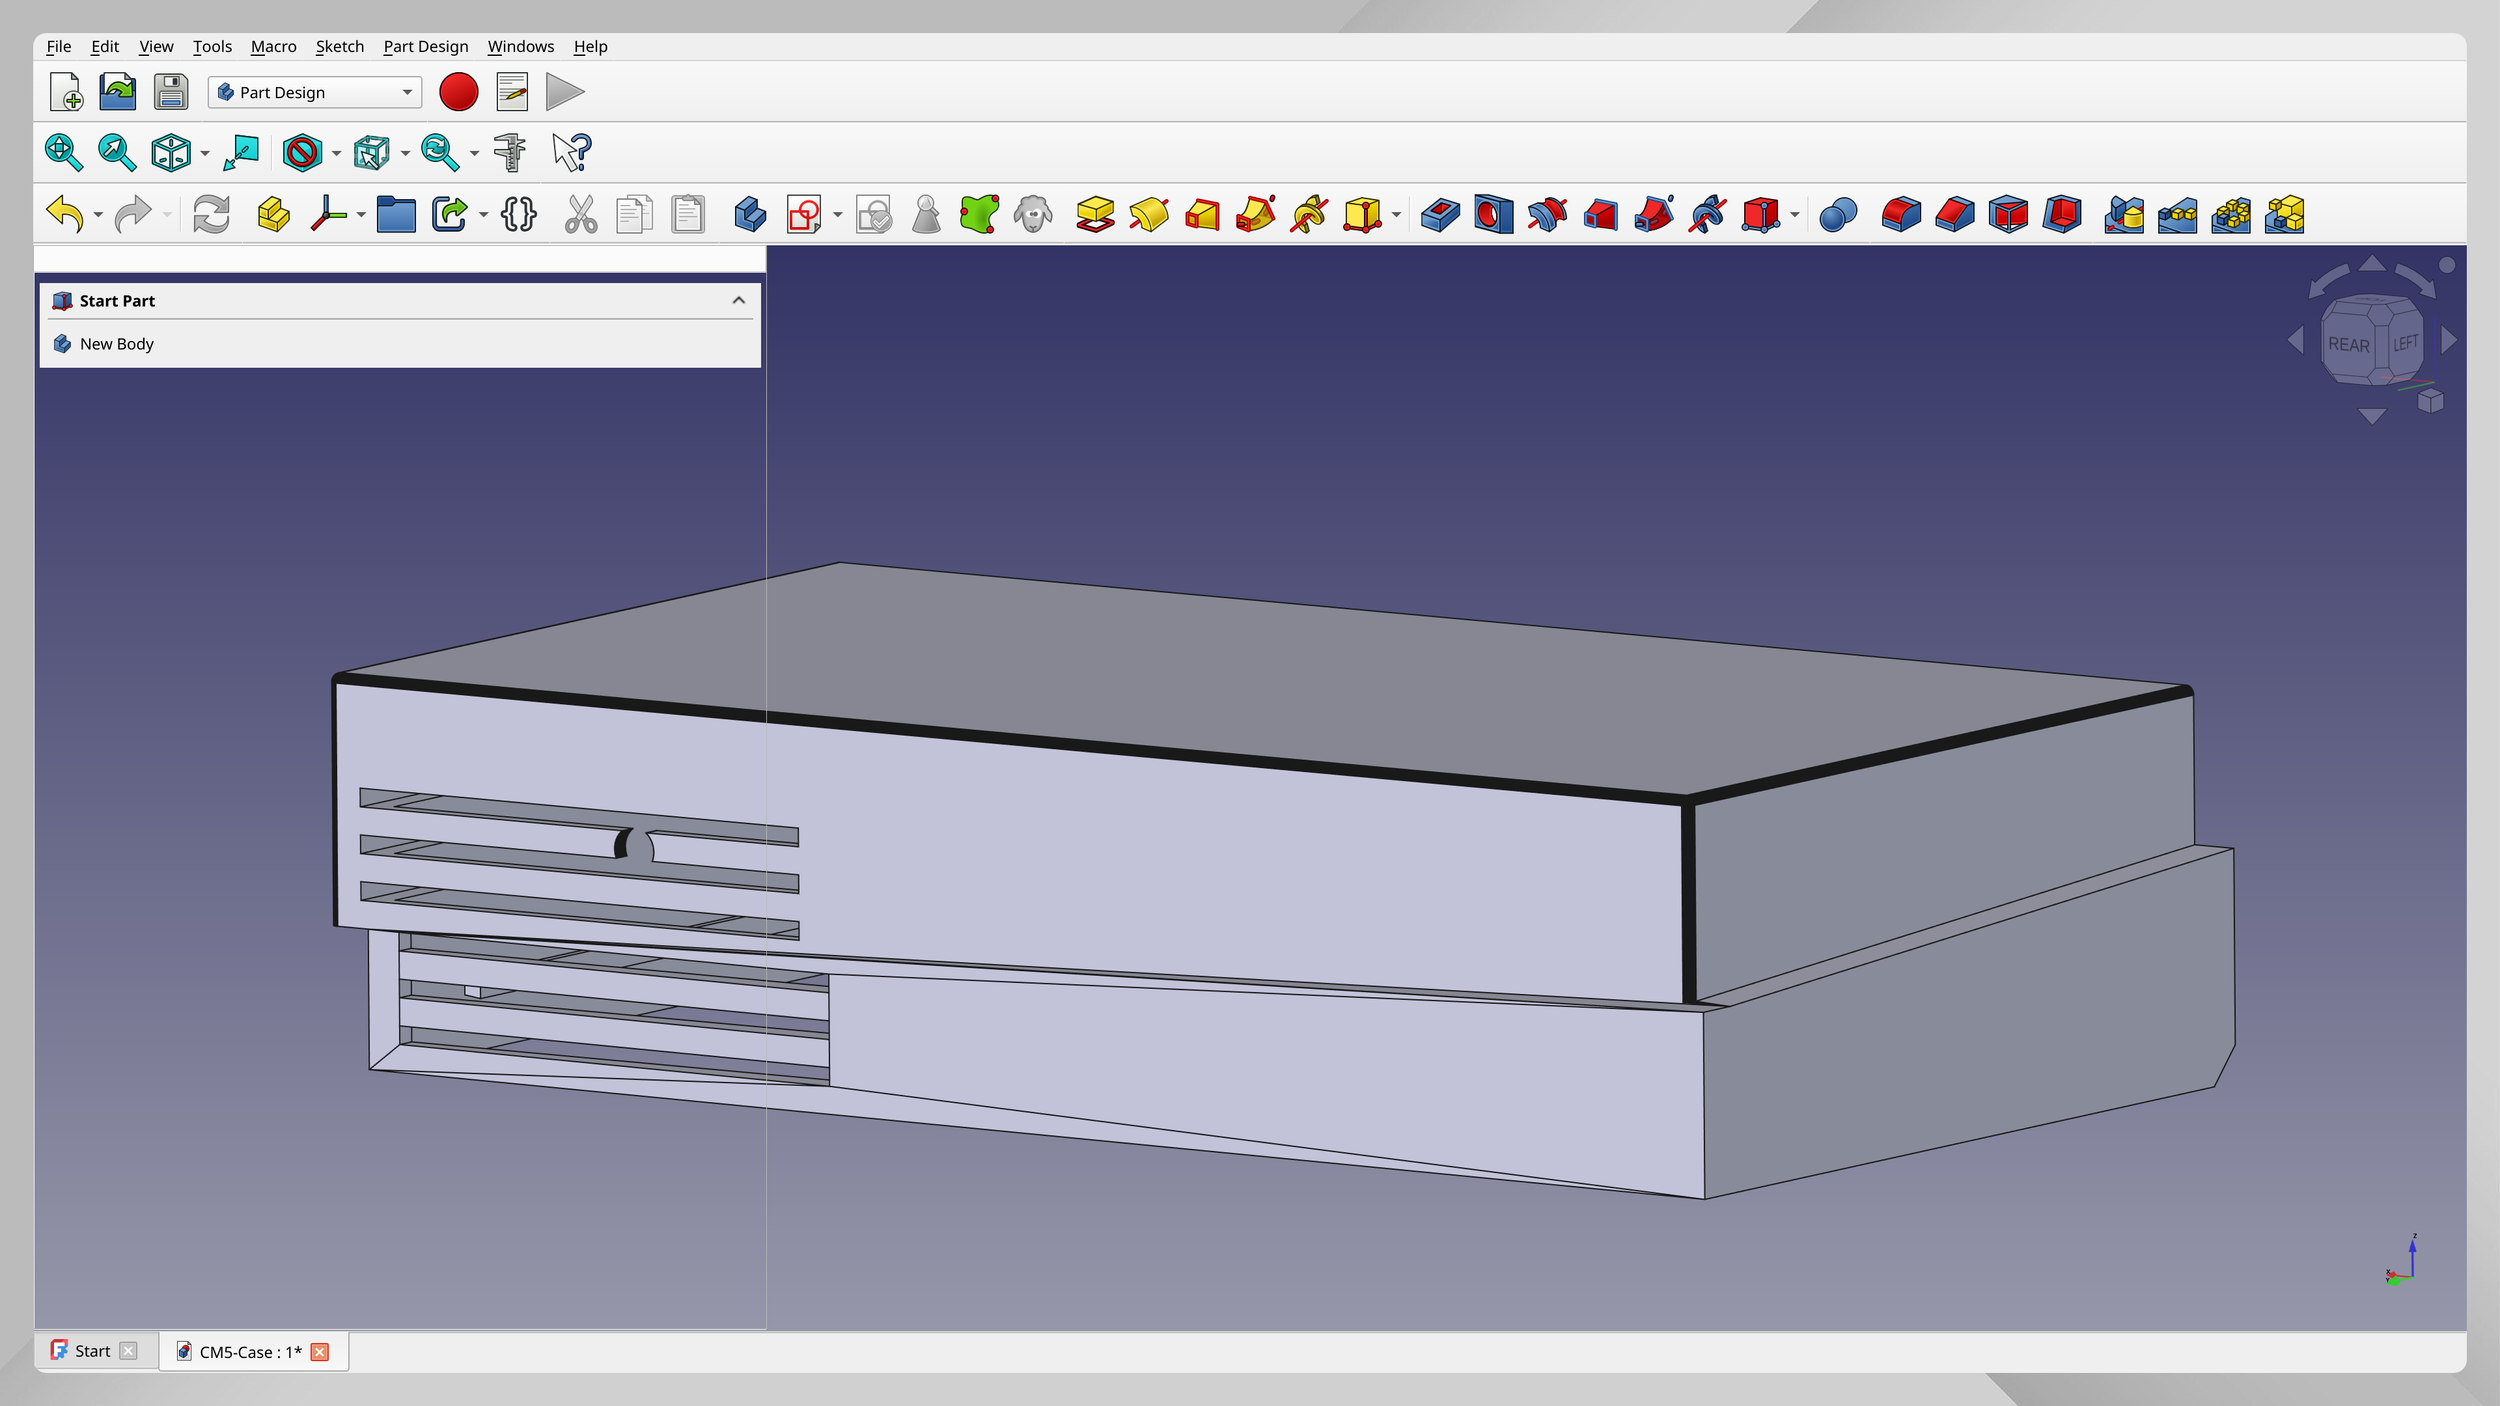
We designed in FreeCAD, a free, open-source 3D design application, which felt appropriate for a project built around not being locked in. And because the files were always going to be shared, designing in open-source software meant anyone could open them without needing a licence.
The goals from the start:
Horizontal desktop orientation: low and wide, living under the monitor
Front vents echoing the Indy grill geometry: functional, but intentional
Rear panel that is easy access: components should be simple to get to
Passive cooling: generous airflow before a fan gets anywhere near the conversation
M.2 SSD storage: a small, fast solid-state drive slotting directly onto the carrier board, not a microSD card prone to failure
The trickiest part was the rear port cutouts. Tolerances vary slightly between print runs, and it took several passes to get them right. The lid attaches with two screws, solid enough to stay closed and simple enough to open when you need to get to the innards.
Material: why ASA?
The case is 3D printed, and the choice of material matters more than it might seem.
PLA is the most common printing material. It softens around 60°C, which is fine for prototypes but not for something sitting on a desk under a monitor for the next decade. PET-G handles heat better but can be unreliable with paint and UV exposure over time.
We used ASA. It's tougher, holds its shape up to around 100°C, resists UV yellowing, and takes paint evenly. Slightly more demanding to print than PLA, but this case is meant to outlast several generations of Pi hardware. It earns the extra effort.
Colour and finish
The colour nods to the Silicon Graphics Indy teal, not a perfect match but recognisably in the same family.
The finish is matte and slightly textured from the print, mimicking the feel of 90s workstation plastics. Not glossy. Not heavily grained. This sounds like a minor detail, and in isolation it is. But a considered finish changes how you feel about using something every day. For those of us main-lining nostalgia, details matter.
Putting it together
Printing takes a good chunk of a day at high quality. Make sure the first layer goes down correctly, then check in periodically.
From there: sanding from coarse to fine (we used 100 grit to 400), colour in thin layers.
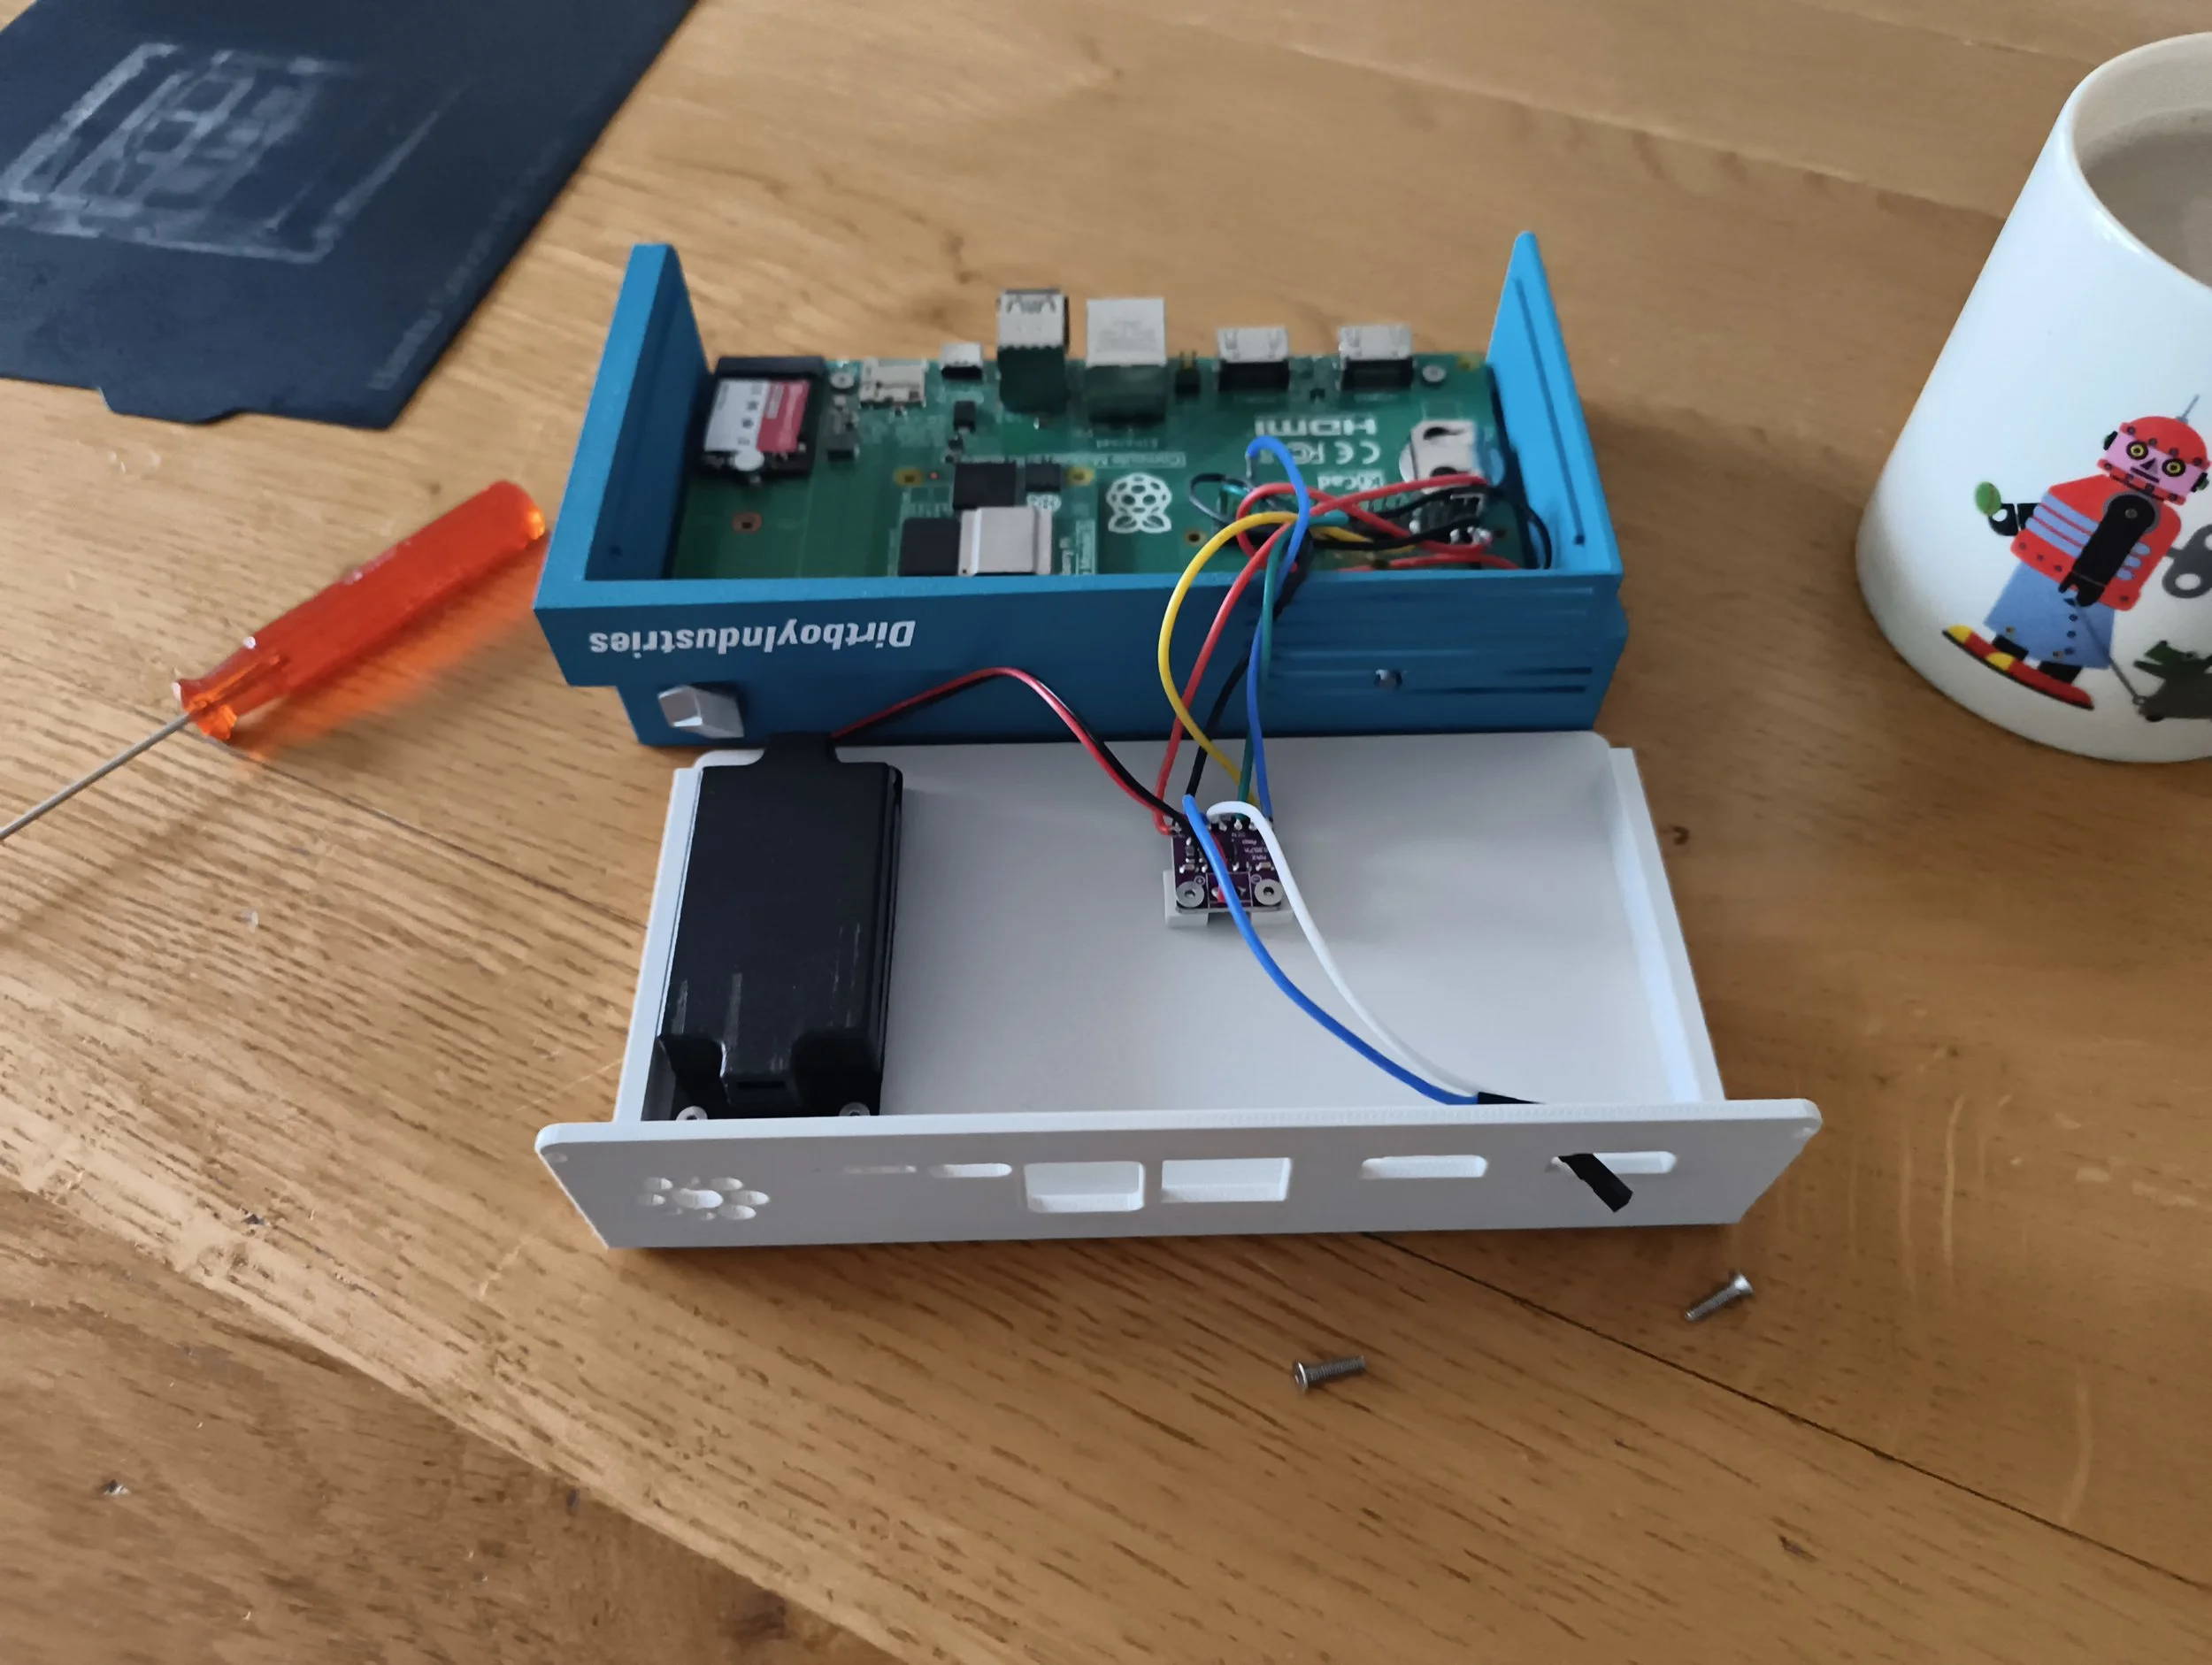
The SSD goes into the carrier board before everything closes up, while there's still room to work easily. The Compute Module clicks in firmly. The power LED, amplifier board, and speakers attach to the lid and carrier board hat. Cables routed through internal channels. Backplate on. Done.
The built-in speaker sound quality is, genuinely, better than expected. We used an 8 Ohm speaker for a previous build and the sound quality was tinny, but the pairing with a MAX98357 (approx $5) amplifier seems to have solved that. If anything the startup sound is a little too good.
The result
The first boot is completely quiet (apart from the jazztastic fanfare), because there's no cooling fan. We'll keep an eye on the processor and if it starts to throttle due to excessive heat, then we'll add a fan. Raspberry Pi OS loads to the desktop in seconds. Responsive and quick.
The keyboard is whatever you want it to be. It changes occasionally depending on who's using the machine. For the photos, we're using a kprepublic BM40 ortholinear keyboard.
Open the lid: two screws, carrier board visible, Compute Module right there. When the next generation arrives, swap it in, close the lid, and carry on. The case will outlast several generations of Pi hardware.
Done.
Build your own
Everything you need is in our GitHub repository: 3d printable files, hardware list and full build notes.